
The ins and outs of MoonLight setup and takedown
A new setup/takedown video and explanation of the features and gizmos:A new video for just the EyePole (if you have or are looking at one of our PLUS tents, the ones with those honking big 13.55mm poles, you really need to watch at least this one):
SET UP – Easy But a Little Different (videos below)
I don't know about you but I hate reading setup directions. It's tedious and even really simple setups can be hard to follow. Do yourself a favor and just watch the video.
Setting up the MoonLights is physically easy but you do need to know something new: how the EyePole goes together and comes apart.
Assembling the EyePole
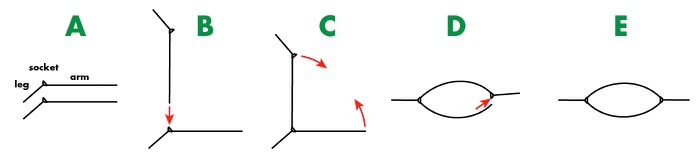
A) The EyePole starts like this: two identical, mostly GREEN polesB) Plug the arm of one into the socket of the other - the end that goes into the hub socket is color-coded dark gray to indicate that it goes into the dark-gray hub.
C) Flex the two ends together
D) Put the other arm into the socket
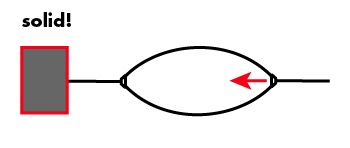
To take the EyePole apart, do the reverse but be mindful to flex the poles against a solid object as shown below.
-Note that the dark grey coloring of the ends of the poles also lets you know which way it comes apart. If it was all green, you wouldn't be able to tell which section comes out out of the hub and which is shockcorded to the hub.
For the MoonLight 2, there’s not much more to be said. As you put the EyePole into the tent you will be guided by the color coding as to which way is up for the eye so that the Swivel-CHL can lock onto the black plastic rings on the eye. If the little rings and the CHL don't line up, just flip the pole over.
The MoonLight 2+, 3+ and 4+ poles are quite stiff so some technique is important for operations C & D. Hold the socket/hub in your Right hand and the arm of the other pole in your Left hand. Bring your hands together at belly level and push the already assembled end into something solid to flex the poles (see diagram below). In particular, as you’re flexing the poles to engage or disengage them from the hub, use your body weight - not your hand strength - to flex the poles to the point where they slide together/apart easily. Especially taking them apart, use your hands to feel the release point and then pull them apart in one motion.
MOST IMPORTANT: On the MoonLight 2+, 3+ & 4+, when taking the EyePole apart it is especially important that you flex the pole as shown below against a solid object. As you push and flex the eye, you will feel the end of the pole become loose in the socket/hub just when it's in the right position to pull it out. At that point, not before, pull the pole end out of the socket all the way before relaxing the flex.
Once the poles are together, here’s what to do next:
Pitching the tent
1) Lay out the tent and pop the ballend of the straight GOLD pole into the tent corner fitting held by GOLD web. That corner fitting is called a Jake's Foot. When you're taking the tent down, you pop the pole back out of the Jake's foot by simply twisting.
2) Put one end of the GREEN EyePole into a GREEN webbed Jake’s Foot
3) Look at the EyePole and notice the little black plastic rings. Those rings snap into the fittings on the main GOLD pole (called a Swivel-CHL). On the MoonLight 3 and 4, there's a pretty obvious UP and DOWN to the EyePole because the hubs are angled. On the MoonLight 2, the hub is flat so there's more color coding to help you: the pole sections to either side of the black ring are colored GOLD so you know to orient the EyePole GOLD to GOLD. If the EyePole GOLD sections don't match up with the main GOLD pole, it means you need to flip the EyePole over.
4) Plug the other end into the Jake’s foot on the other side of the tent and pop the EyePole rings into the GOLD pole Swivel-CHLs, Be sure to flip the little black keeper latch on the CHL.
5) Clip the tent to the poles and you're done.
Here’s the MoonLight 2 setup video which is also the one to watch for the UL2:
Here’s the MoonLight 3+ & 4+ setup video which is also the one to watch for the 2+:
Pitching the rainfly
1) Pull out the rainfly and drape it over the tent. You have two big navigation aids: the narrow diagonal top seam should match the tent’s top pole (brown) and the vestibule doors go right in the middle of the tent’s door side.
2) Clip the rainfly corner buckles to the matching tent corners. Tighten them after all the buckles are clipped. Note that because the polyester fabric is so stable, you may very well want to leave the adjustment in one place all the time. It takes a bit more force to do the clip but it really works quite well.
3) pullout and anchor the vestibules.
done
Here’s the rainfly-only pitching videos:
Things we've done to make pitching easy include:
• Color coded poles, clip webs and corner webs
• Pole ends attach by snapping into the "Jake's Foot" corners. They don't pop out when you go from one side of the tent to the other.
• The rainfly attaches to the tent with adjustable quick release buckles and those webs are color coded too
• The rainfly coloring is designed to let you easily find the vestibule points (which are the doors). Follow the long triangular tan-colored panels to where they come together. There is also a diagonal stripe of tan over the top of the fly that lines up with the ridgepole.
• All stake- and guy-line cords are adjustable and long enough to be used with rocks and logs without additional cord
I feel like I’m going to sound like a broken record but the MoonLight tents REALLY need to me anchored to the ground very well. They make large and very powerful kites if left unanchored. But for the MoonLight 3 & 4, there’s often another powerful force at work in the campsite. It’s also a force of nature but it can be one heck of a lot more random about when it strikes. I’m referring, of course, to kids. You’ve heard the expression “bouncing off the walls?” That’s literally what kids do in these tents. No kidding. They will run straight into the walls because it’s fun to be bounced by them. We’re even adding reinforcement to the side clips because of this. So if the tent isn’t anchored really well, the tent’s going to be rolled over and that’s probably not good...
So please anchor the tent down really well. We made it easy because it’s important.